(You'll notice I skipped the part about hiking over Kearsarge Pass, Glenn Pass, and Rae Col on the way to our base camp in Sixty Lakes Basin. It's long, it's only moderately interesting, and there were no bugs until camp.)
Once you get to the summit block there's no doubt about where the REAL crux of the climb is. An awkward move (balanced on a pointy rock that provided much gutter humor) onto the boulder just below the summit reveals where the knotted rope is, and then you've got to trust a one-hand mediocre hold to vault yourself onto the summit block proper. Not a fun one to get down! Others have reported that you can't protect the top, but in fact a rope thrown over the summit can be used to belay off one of the huge boulders below and a 20' sling can be used to set a belay station right on the summit. We did both, climbing on belay and leaving no fixed anchors.
Returning to camp we found the RIGHT way down from the saddle south of C'King... Secor says to use a ledge in cliffs on the east side of the saddle or sand and talus to the south. That's right, but hard to understand because the saddle is on a north/south ridge! The subsidiary ridge defining the south edge of the bowl east of the saddle is definitely the easier route - traverse from the saddle out onto the ridge until you see a prominent 60' tower where you can either descend a scree chute to the south or continue east on ledges to a small lake.
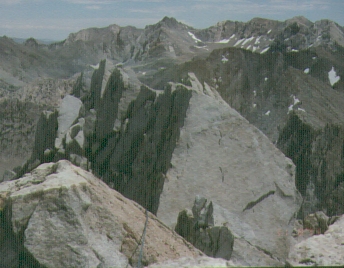
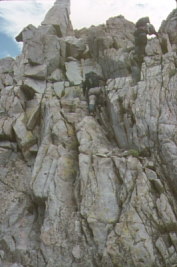
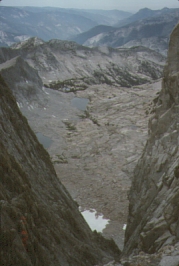
The next day we headed for Gardiner, which (from the upper reaches of Gardiner Basin) remains second class until you pop up onto the horseshoe ridge between the summits - a most unusual summit ridge, with 4 summits and a 700' chasm in between! There is straightforward but vertical class 3 down to a small saddle, and then easy ramps luring you toward the final summit ridge. The last 2' of elevation gain took 3 belays due to our half length rope and the long traverse. There is extreme exposure on both sides, and an intimidating view of the cliff forming the other half of the horseshoe, which has boulders piled on little projections but is overall nearly vertical.
Pictures of Gardiner's summit ridge, the downclimb to the notch, and the
walls of the horseshoe:


I suppose the urge to brag is related to the difficulty of the peak, which explains why we saw a number of entries from people who disdained the use of a rope for Gardiner. Quite a few solo entries also. The holds are pretty good, but you won't get a second chance. Take the rope. It's a great climb, but it's not trivial. We used only slings for protection, aside from one small chock that threatened to work loose anyway.
Somehow we burned up the entire day, returning to the base of Gardiner at around 4:30pm with dark clouds gathering and the wind picking up. Those not working on the SPS list returned to camp, while I sprinted for Cotter after tanking up on water. I took no rest breaks, but still did not quite beat the weather. Just as I got to Cotter's south ridge, snow threatened to slicken the large granite flakes I was on and the wind convinced me to retreat to the east side instead of walking the ridge itself. The storm obscured some, but not all, of the valleys below.
A note to the ultralight packers among us: I had a heavy sweater and thicker gloves in reserve, extra food, plenty of water, and a mylar 3 ounce bivy bag. Without those things, the only sane choice would have been to turn back with the others. The extra two pounds of gear would have saved my bacon if the weather had really gotten nasty, and did not slow me down enough to matter! No one can predict the weather from day to day or hour to hour. You preach at me about a lighter pack, I'll preach back about survival.
Most of Cotter (from the base of Gardiner) is second class, but if you stay on the ridge you'll get into some pretty committed third class. The summit itself is very steep, with good holds. I fished the register out from below the summit boulder with a trekking pole (Beck and Holloway are the names I remember as being the last to sign in, but there's no telling if they're the ones who dropped it.)
As it turned out, the snow quit shortly after I reached the peak and the wind was lashing at the opposite side of the mountain as I descended sand and slabs directly down the east face. I reached camp about 20 minutes after the others, where Bees greeted me with "Welcome Back Cotter" and some reasonable skepticism as to whether I had actually made the summit.
Monday we split up, with Bees warping to the trailhead about 3 hours ahead of us so he could get home to his wife's dinner party that night. Once again, the Onion Valley rangers were true to form: No one checks permits on the way IN, but I've been carded three times on the way OUT there. It seems we don't care if people get in, but we want to fine them on the way out, eh? They also hung up signs indicating you MUST have a bear canister, but that does not match the official regulations (which just say you have to protect your food).
Oh yes, the hike out is also long and it's only moderately interesting.
Details:
Aug 29 - Sept 1, 1997
Charles Schafer (leader), John Bees, Steve Eckert, Tim Hult.
Mt Clarence King  (12,905') class 4s5
Mt Gardiner (12,907') class 4
Mt Cotter (12,721') class 2s3
Here's how Schafer remembers the part above the second class approach to Clarence King:
Work up the south face, climbing up and around class 3 blocks for about 100', until it steepens significantly just below the summit. Along the right half of the face is a moderately angled slab whose right edge leads to the jam crack described in Secor. Work up the left edge of this slab until you can move onto a small block to your left. Climb onto the block and move left to the base of the washboard. Move up over several lumps of the washboard until you can step up to your right onto the first of several blocks. Traverse on a diagonal over progressively higher blocks until you reach the rappel point, which makes an excellent belay stance. The crux is one 4th or easy 5th class move at the beginning of the diagonal traverse, while the rest is class 3/easy class 4.